Search This Blog

Monday, November 2, 2015

ITALIAN BISCUIT COOKIE


This recipe is for an Italian Biscuit Cookie or as my husband likes to call the " Dream Cookie."  You may be wondering why he calls these cookies the "Dream Cookie"?  These cookies are so good you feel like you are in a dream?  The sugar, butter and almond flavoring combine together and literately melt in your mouth.  Add the buttery & creamy icing to the top and you feel like you have died and gone to heaven!!!!  I found these biscuits on Pinterest and they were called "Spring Biscuit Cookies".  Let me tell you....you can make these cookies in the spring, you can make them in the summer, you can make them in the fall, you can make them for Easter, Christmas, Birthdays....etc....No matter when you make them or where you bring them I promise you they will be gone, gone, gone! I have made them for Easter & Mother's Day and I tinted the frosting pastel colors or left them plain white and sprinkled pastel sugars on them.  This time around I made them for a trick-or-treat broker open house (yes, we are trying to sell our home).  As you will see I tinted the frosting a light orange, placed a candy corn in the middle and wrapped them up as a "thank you" goody bag.  I doubled the recipe and brought some over to a friends house as a gift for Halloween and brought extras to my parents Halloween party.  Make these cookies once and you will make them again, and again, and again!  People will request you bring these to their parties!  These are the types of cookies you will not be able to eat just one.  You eat one and then you just keep eyeing the platter of cookies and sooner rather than later you just go ahead and grab another...because they are just that good!  Believe me..or rather believe me husband when he says these truly are a "Dream" Cookie!

Monday, October 26, 2015

CAPRESE POLENTA BAKE

With cold weather approaching (rather quickly if you ask me) comfort food starts making a comeback into our family meals.  Comfort food usually means calorie laden and rather heavy.  Over the week-end I tried to play around with a little bit comfort and a little bit healthy and created this flavorful Caprese Polenta Bake.  We grilled some steaks and served this bake with an Arugula & White Bean Salad w/ Fresh Lemon Vinaigrette (recipe to be posted soon).  You get the comfort from the creamy, cheesy polenta and the healthy from the fresh grape tomatoes and basil. This was my last ditch effort to create a little something "fall" with the last flavors of summer. It turned out perfect, made my kitchen smell wonderful and got a lot of "OH's and AH's" when it was taken out of the oven!!!


INGREDIENTS: 
-  4 cups Chicken Broth (32 oz.)
-  3 cups water (can add extra to thin out polenta if needed)
-  1 tsp. Pasta Sprinkle Seasoning (can use a mixture of dried basil & oregano)
-  2 cups Dell'Alpe Instant Polenta
-  2 tsp. tomato paste
-  1/2 cup grated parmesan cheese
-  1/8 tsp. salt
-  fresh ground black pepper and crushed red pepper to taste
-  2 cups shredded mozzarella (divided)
-  1/2 cup halved grape or cherry tomatoes
-  2 TB. fresh basil
-  1/4 cup extra virgin olive oil
-  sprinkle of kosher salt and fresh ground pepper


DIRECTIONS:
1.  Pre-heat oven to 350 degrees.
2.  In large saucepan bring chicken broth, water and spices to a boil   Once boiling add polenta.  Turn
     heat down to medium and continuously stir with a wooden spoon.
3.   Add tomato paste and parmesan cheese. Stir until smooth.
4.   Spray 8x8 baking dish with Pam.
5.   Scoop half of the polenta mixture into dish and spread evenly.
6.  Add 1 cup shredded mozzarella to the top of polenta.
7.   Top with remaining polenta mixture.
8.   Sprinkle top with remaining cup of shredded mozzarella.
9.   Place halved tomatoes, cut side up, to the top of the cheese.
10. Add chopped basil to top of
tomatoes.
11. Drizzle top with olive oil and sprinkle with kosher salt and fresh ground pepper.
12. Bake at 375 degrees for 20-25 minutes until heated through and cheese is melted.

Thursday, October 22, 2015

APPLE SLAB PIE W/ APPLE CIDER GLAZE


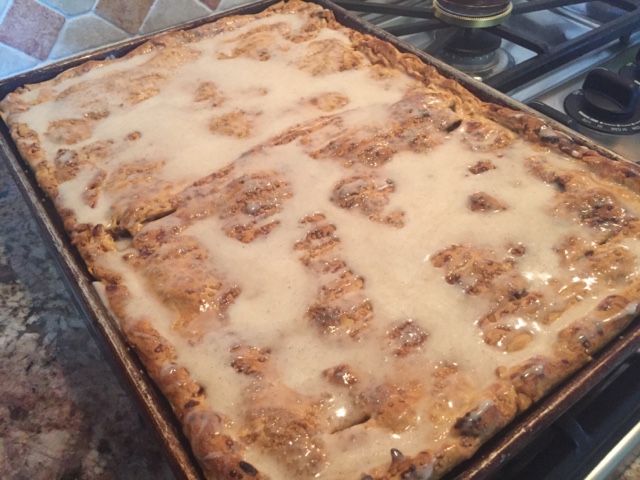
I know I said I was trying to eat and feed my family more healthy, but how could I possibly have my first "come back" post a super healthy recipe?!?  I decided to come back with a bang!  This Apple Slab Pie w/ Apple Cider Glaze was just the recipe I needed!  First, it is fall so Apple pie is a must. This is not just any Apple pie...this is a slab pie!  A slab pie is meant to be made when you need to feed a crowd...a hungry crowd that is!!  I made this for my families October birthday celebration. It was a hit!  Want to know how I know this?  My mom ate two pieces...and not within a few hours of each other, I am talking back to back pieces!

You will notice I don't have a recipe for the double crust. There is a reason...I usually don't make my own crust. There are things I love to take the time to make from scratch, but pie crust is not one of them. It is such a time saver to grab a crust or two from the store. I did however take the time to set up my Pampered Chef Apple Corer and Peeler I received as a gift from my mother in law. It took some cursing and a bit of frustration, but once it was together it was a blast to peel, core and thinly slice my apples all in one fell swoop! Hey it does not take much to make this girl happy!!!   What does make me happy is this slab pie. Please take the extra step and save the apple cinnamon juicy goodness that will be drained from the apple filling. When mixed in with the other ingredients it makes the perfect glaze for this yummy pie!!!

Serves 18

Ingredients:
 
Pie Crust & Filling
-  4 store bought round pie crusts (I prefer Pillsbury)
- 10 to 12 Granny Smith apples, peeled,  cored & sliced thin   
 -  1 1/4 c. Sugar
-  2 tsp. Cinnamon
-  4 TB lemon juice
-  6 TB cornstarch, divided
-  1/4 c. Heavy cream (for brushing top of crust pre-baked). 
-  Course baking sugar (to sprinkle over the top of pie pre-baked)
 
Glaze
-  2/3 c. Reserved Apple juice (from filling)
-  1 TB. Unsalted butter melted
-  1 1/2 c. Powdered sugar

Equipment:
-  Pam spray
-  parchment paper
-  jelly roll pan
-  pastry brush
-  rolling pin

Directions:
1.  Preheat oven to 375 degrees or 350 degrees if using a convection oven. 
2.  Lightly spray jelly roll pan with Pam Spray. Line jelly roll pan with  
     parchment paper.
3.  Take out two of the pre-made round pie crusts. On a lightly floured service 
      use rolling pin to make each into a rectangle. This does not have to be 
      perfect. The goal is to line the jelly roll pan with crust so entire bottom is
      covered and coming over sides by about an inch or two. 
4.  In a large bowl mix together: apples, sugar, cinnamon and lemon juice. Set
     aside for about 10 minutes so that excess apple juice will drain.
5.  Sprinkle 4 TB of the cornstarch over the uncooked pie crust that is
      waiting to be filled in jelly roll pan. 
6.  Drain juice from apples- I placed a bowl over a colander and poured
      Apple mixture into colander. Once  juice is drained reserve it. Place 
      drained apples back into a bowl and sprinkle with remaining two TB of
      cornstartch. Mix well. 
7.  Scoop out apples and place over the uncooked pie crust in jelly roll. 
      Make a nice even layer so apples cook evenly.


8.  Roll out remaining two pie crusts into a rectangular form. Again, this does 
     not have to be picture perfect as long as it covers the top of the pie. 
9.  Fold the bottom layer of pie crust up and over the top layer. Pinch together
     with fingers or a fork so edges are seamed together. 
10. Brush top of pie with cream. Cut vents into dough so steam can 
       escape. Sprinkle with course sugar. 
11. Place pie uncovered in oven and bake for about 45-50 minutes until
     golden brown. 
12. In the meantime make the Glaze:
       In medium bowl mix reserved apple juice, melted butter and powdered
      sugar. Whisk until smooth. 
13. Once pie is done baking cool completely.  Drizzle top of pie with
      glaze. 
14. Serve with a scoop of vanilla ice-cream. 


Tuesday, October 20, 2015

I'M BACK!!!!


It has been at least 3 years since I last posted. What can I say, life got a little bit hectic!!  Life is still crazy hectic, but I have found the time to cook again and now I anything to find time to blog my recipes as well. I now have four children so most of the recipes I am posting will be family friendly...aka...kids under 10 will eat!!  I am also now a few years older than I was when I first started blogging so I am trying to not only eat healthier but also feed my family healthier meals. I am now also venturing out with slow cooker recipes as time is short and meals at times have to be fast due to the fact my kids are in every activity/sport imaginable. We've got tennis, cheerleading, softball, t-ball, soccer, tumbling, basketball, Religious Ed., Spanish class and engineering class. Did I mention my fourth child is only three so he is not started activities yet. We have also have our home for sale...try keeping a house clean every day with these crazies!!  Long story short since I last posted...we now have a full house of six people in our family, life has gotten very crazy, but we are happy and healthy and trying to live each day to the fullest...even if each day ends with me pulling my hair out!!!


Monday, July 9, 2012

THE GRAND FINALE FOR THE FRANCESCONI FAMILY!!

Ok ladies and gents it has been a while...ok a very long while since I last posted...BUT...the last Francesconi "Bun" is out of the oven.  Baby #4 - Leo Michael Francesconi was born on June 5th weighing in at a whopping 10 lbs 2 oz and 20 inches long.  We have made it through the first month (just a barely) w/ four kids four and  under!!  If you can believe it or not I have been trying some new recipes and plan to post them when I can.  Please bare w/ me and keep checking for my new posts.  Don't forget to check out my old posts either!!

Monday, January 16, 2012

CIAMBELLONE - TUSCAN RING CAKE

I'm back!!  Well, I am back for at least the night.  Let's take the blog posts one post at a time!  For those of you who are not aware...I am pregnant with my fourth!  Yes, we will now have twin four year olds, a 15 month old and a new born....ahhhhh!!!!  I have not been able to post because I was so ill during my whole first trimester.  Now I am well into my second trimester, but to find any time to myself with a house full of little bambinos is close to impossible!  I have in fact found the time tonight and am very excited to tell you about a new cook-book I have fallen in love with.  The cook book is called  " Cucina Povera - Tuscan Peasant Cooking".  I have always labeled my cooking as "rustic gourmet".  I do not cook fruffy food with funny, unknown ingredients.  I cook using simple and fresh ingredients that are not complicated.  This cook book is simple italian food that reminds me of my grandma big time.

  Within the last week I made three recipes , the first of which is called "Ciambellone" a tuscan ring cake.  Italian deserts are my most favorite, because they are high in flavor, but low in sugar. This cake uses 8 ingredients that most of us have in our kitchen at all times with some added lemon zest and  fresh squeezed lemon juice.  It also calls for a cup of extra virgin olive oil which makes this tremendous crispy crust on the outside of the cake while leaving the interior of the cake moist and delicious.  These recipes are very old fashioned and do not use any high tech kitchen gadgets.  When mixing the ingredients to this recipe I used just a regular wooden spoon as not to overmix anything.  I sprinkled some powdered sugar atop the cake and served a dollop of fresh whipped cream on the side.  Super simple and super yummy!

Sunday, November 6, 2011

HALLOWEEN SPIDER CUPCAKES

We have a Halloween get together every year and every year I try to find a fun dessert that my girls can make with me.   This year I found a really cute recipe for Spider Cupcakes that were super simple to make, easy for my girls to decorate and yummy for the kids (and some of the adults too!) !


Thursday, November 3, 2011

PUMPKIN SPICE CUPCAKES W/ CINNAMON CREAM CHEESE FROSTING


This is a re-post from last year at this time.  I rarely do re-posts, but this recipe deserves it!  These cupcakes are my absolute favorite!  The cake part is not overly sweet and they go so well with the cinnamon cream cheese frosting!  These cupcakes will be the hit of any holiday party Thanksgiving thry New Years!

PUMPKIN SPICE CUPCAKES W/ CREAM CHEESE FROSTING
  • 3/4 cup butter, softend
  • 2 1/2 cups sugar
  • 3 eggs
  • 1 can (15 oz.) solid pack pumpkin
  • 2 1/3 cups all purpose flour
  • 1 TB. pumpkin pie spice
  • 1 tsp. bkg. powder
  • 1 tsp. ground cinnamon
  • 3/4 tsp. salt
  • 1/2 tsp. baking soda
  • 1/2 tsp. ground ginger
  • 1 cup buttermilk
Frosting:
  • 1 package (8 oz.) cream cheese, softened
  • 1/2 cup butter, softened
  • 4 cups powdered sugar
  • 1 tsp. vanilla
  • 2 tsp. ground cinnamon
  1. In a large bowl, cream butter and sugar until light and fluffy. Add eggs, one at a time, beating well after each addition. Add pumpkin. Combine the flour, pie spice, baking powder, cinnamon, salt, baking soda and ginger, and to the creamed mixture alternately with the buttermilk, beating well after each addition.
  2. Fill paper lined muffin cups three fourths full. Bake at 350 degrees for 20-25 minutes or until a toothpick inserted in the center comes out clean. Cool for 10 minutes before removing from pans to wire racks to cool completely.
  3. For frosting, in a large bowl, beat cream cheese and butter until fluffy. Add the powdered sugar, vanilla and cinnamon, beat until smooth. Frost cupcakes.
* Makes about 2 dozen cupcakes
** I suggest you keep them in the fridge since they have cream cheese.

Monday, October 3, 2011

ORZO SALAD

I have started making some terrific fall recipes and I cannot wait to post them all (when I have time)!  But...I realized I do in fact have a bunch of summer recipes that I have not posted yet.  I am going to try to "squeeze" the last bit of summer out this week and post some summer favorites that I made for family and friends recently.  The first of these recipes is a super simple and quick Orzo Salad that I made for a friend to take to a baby shower a month or so back.  There are so many recipes out there for pasta salads you could make one every day for a whole year and still not get any where near making them all.  The one thing I have realized is that pasta salad is very filling.  For this reason when making a starchy salad for an all women's party I try to stick to either orzo or couscous.  Does it make any sense when I say it is more "lady like" when eating more of a dainty pasta like orzo or couscous rather than a big tortelinni?  That being said this recipe is also great along side a simple piece of grilled chicken and grilled salad for a fast summer meal!

Wednesday, September 21, 2011

THE PERFECT PULLED PORK

Have you ever had that one meal or recipe that you are constantly on the search for "the perfect one"?  I did and it was a quest for the perfect pulled pork recipe.  There are complicated recipes for pulled pork where you have to use a smoker.  There are recipes where you add smoke flavor.  There are recipes where you use the slow cooker.  There are recipes that call for Carolina bbq sauce that is vinegar based.  There are recipes that call for Texas bbq sauce that are  tomato based.  Let me tell you....I have tried them all.  All the recipes I have tried have just been ok, but they have not been that "keeper" recipe that you can make again and again.  A few months back I found THE ONE!  I actually found it on another blog called Kevin & Amanda.  They said it was the perfect pulled pork and they did not lie...it is the perfect pulled pork.  You first brine the pork roast for at least 8 hours.  Then you completely cover the brined pork roast with the best dry rub mix.  Next, you slow cook the roast at 225 degrees for about 8-12 hours until it shreds like butter!!  I paired this perfect pulled pork with a super simple bbq sauce recipe by Emeril.  You don't even have to cook the BBQ sauce.  The only thing I added to the bbq sauce was a bit of hot sauce or Franks' Red Hot to spice it up a bit.  I have made this recipe for the past several catered parties and it is always a huge hit!  You can use any type of bun or roll that you want....but I drive about 1/2 hour to a deli in Naperville to get the best Challah rolls ever.  They really do make the sandwich!

Wednesday, August 17, 2011

FARMERS MARKET PASTA

This Farmers Market Pasta was the second pasta I served at my parents 40th anniversary party.  Like usual I found a recipe that seemed like a good one BUT I tweaked it here and there to make it my own.  The original recipe I found was a Tyler Florence recipe.  His recipe included ground pork sausage, but I switched that out for grilled and sliced italian sausage.  I also added sliced mushrooms and quartered artichoke hearts.  I roasted some grape tomatoes with sliced garlic and olive oil with some kosher salt and fresh ground pepper and that created the "sauce" when mixed with a little of the salted pasta water.  This dish was a hit!  The key to making the dish a success was to cook/saute each fresh ingredient one by one.  In this way they are cooked the way each ingredient should be cooked.  The zuchinni is not overcooked and mushy and the mushrooms stay in tact and keep their shape.  Once everything is grilled, cooked, roasted and sauted you can add them quickly to the pasta so not to overcook anything.  Toss it all in in a big bowl with a ton of fresh grated parmesan cheese and you will have a pasta dish that everyone comes back for seconds for!!!!

Sunday, August 7, 2011

SEASHELL PASTA W/ FRESH TOMATO BUTTER SAUCE & CREAMY BURRATO

This was #1 pasta out of two that were passed around the 30 person seated dinner party at my parents 40th anniversary party.  I have posted this pasta recipe before, but it is my families all time favorite; therefore it deserves a second posting!  You start by making a super simple tomato butter sauce.  Make the pasta al'dente and place in a large pasta bowl.  In the center of the pasta place diced up burrato  mozerella cheese.  Ladle some piping hot sauce over the top which slightly melts the cheese and the cream just pours out of the cheese.  I have an embarassing confession to make.  The first time I bought burrato cheese was by accident at Costco.  I was having a large family party and I meant to buy fresh mozerella that was to be used for eggplant parmesan.  When the day of the party came and I was making the eggplant parmesan, I cut into the mozerella cheese and all this white, creamy liquid came pouring out.  I tried another mozerella ball and the same thing happened.  I opened a whole secocond package and the same thing happened to all the mozerella balls.  Well, I just thought Costco had put out a really bad batch of mozerella cheese.  I returned both large packages the following day and told customer service that it was a bad batch of mozerella.  What is embarassing is that the cheese was actually Burrato, a form of mozerella that has a yummy fresh cream and creamy strips of soft mozerella in the center.  When you cut into the ball the cream and cheese come pouring out.  Long story short....when the tomato sauce hits the creamy cheese you have heaven in a bowl!!!!!

Sunday, July 31, 2011

HEARTS OF PALM & ORANGE SALAD W/ CITRUS VINEGRETTE

This salad is the second salad I served at my parents surprise 40th anniversary party.
 I wish just going to serve one salad to start...that was the plan...but I had found some hearts of palm at Costco recently and I decided I just HAD to make something with hearts of palm.  I found this recipe on a fun blog called The Wednesday Chef.  Let me tell you....even though this was just an "extra" salad, to me this was one of the stars of the show. I have to admit that I was once one of those people who could not stand fruit in my salads.  Savory recipes that included fruit I would completely bypass. My taste buds have changed for the better because I absolutely loved this salad! I changed it up a bit is by adding a small bit of thinly sliced red onion.  The oranges in the salad are supposed to be blood oranges, but since blood oranges have a very short season, I used navel oranges instead.  Also, it calls for the salad to lay on a bed of "frize" salad.  I could not find just frize anywhere...not even Caputos, so I used a spring mix that included some frize in it.  It turned out great.  This recipe is for sure a keeper!

Sunday, July 24, 2011

ARUGULA SALAD W/ SHAVED FENNEL

Arugula is awesome!  If you have never tried arugula you have to go out to the store grab some and make this salad!  It is spicy and crisp and just the  best greens around.  I found this recipe on a blog that I follow (www.prouditaliancook.blogspot.com).  She always posts fresh, easy and true italian recipes.  This was the first salad I served family style at my parents 40th anniversary party.  It is super simple with just a few ingredients: arugula, shaved fennel, toasted walnuts, shaved parmesan all tossed with a simple balsamic vinegrette.  Although the recipe is super simple...the flavors are tremendous!

Thursday, July 21, 2011

TOMATO & BASIL BRUCHETTA W/ FRESH RICOTTA

I have to say I am a bruchetta junky!  I also have to say that it is rare that I find a bruchetta that I absolutely love .  If the bruchetta is already pre-made for you the bread gets really soggy.  If you have to place the tomatoes atop the grilled bread youself some people get lazy and choose to eat something else where they don't have to "work" for their food.  I have played around with different recipes over the years and have come up with what I believe to be the very best bruchetta of all time!  My secret.....I mix up some home made ricotta ( I find home-made ricotta cheese at Caputos) with some olive oil, salt, pepper and crushed red pepper.  I spread this atop my grilled bread before I place my bruchetta topping on top of the bread.  This helps seal the bread in a way where the juices from the tomato topping do not seep into the grilled bread.  Thus, the bread does not get soggy.  You can pre-make the bruchetta right before your guests arrive and place them all on a pretty platter.  When your guests arrive they have fresh (not soggy) bruchetta that is all pre-made and therefore do not have to "work" for their appetizer.  The other secret to this recipe is plain and simple: fresh ingredients.  There are only five main ingredients to this recipe; bread, tomatoes, basil, garlic and olive oil.  Use fresh ingredients and you cannot go wrong!!